The many different editors
When programming using Javascript, only a single editor is shown, the Javascript Code editor. When programming using Python, two editors are shown: a Python Code editor, and a library editor, each shown in its own tab. There are also four more editors available, each intended for a specific purpose. As we saw in the previous chapter, when programming using Python, if you change the mode to edit the world, you will see something like the following:

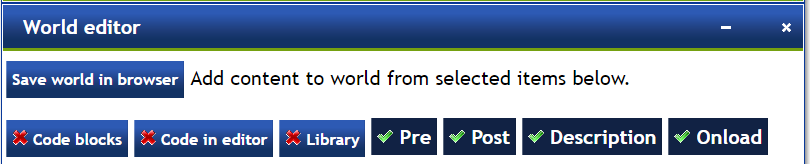
When creating a world, it is possible to save it with some content included for each of these editors. For example, here's what it might look like if we wanted to include the content of four of these editors in a world definition.
Below we explain the purpose of each of these editors.
The Python Code or Javascript Code editor
This editor is where a user enters a program to be executed.
When a program is run without syntax errors, the content of this editor is saved in the browser's local storage, so that it can be "remembered" when a new browser session is started.
Below, we refer to this editor as the main editor.
The library editor
The purpose of this editor is to provide an opportunity for the students to learn about Python's import statement, and realise that a library "module" is just regular program. It is also a useful place for a beginner to save some commonly used functions .
The name library is in lower case in the tab, reflecting its use in a Python program as in
import library

# or

from library import turn_right
[info] En français
In French,
bibliois used instead, as shown in the editor tab when using that language for the user interface.
When a program is run without syntax errors, the content of this editor is saved in the browser's local storage, so that it can be "remembered" when a new browser session is started.
The Pre editor
This editor can contain code (in the same language as the code in the main editor) that is to be run together with the user's program.
Before a program (entered in the main editor) is run, it is concatenated with the code found in the Pre editor, followed by the code found in the Post editor. [For Python, there is extra processing of the code done so that lines about to be executed can be highlighted in the editor, and to allow the variable "watch".] This additional code can be used to add supplementary requirements for a task which could not be done using the menu-driven World editor.
The Post editor
See the Pre editor.
The Description (Desc.) editor
The Description editor is intended to provide some explanation for a given world, like a task to be accomplished. The content of this editor is assumed to be some html code. You may find it useful to include images using the html img tag.
The processed content of this editor can be viewed by the users when they click on the World info button.

You can automatically include in this editor the content of the Pre, Post, or Onload , main editor and library by inserting respectively the strings
INSERT_PRE, INSERT_POST, INSERT_ONLOAD, INSERT_EDITOR or INSERT_LIBRARY
An example of this is provided if you load a world by running a program containing the following instruction:
World("worlds/examples/simple_path_explained.json", "path_explain")
and, once the world is loaded, by clicking on the World Info button.
Even more information
Let's assume that you have clicked (once) on the World Info button so that the window/dialog is showing. If you click on a grid square in the world, you might see some additional info specific to that location appearing at the bottom of the world info window/dialog. For example, with the "path_explain" world mentioned above, if you click on a grid square, you should at the very least get the information about which type of background (grass or gravel) is present at that location.
Suggestion
If you have the World Info window open, close it. Then select one of the worlds that you created in the previous chapter and click on World Info to see the information displayed. Note how the information about the desired final location and the current robot position and the objects it carries is automatically displayed. This type of information is always appended to what you write in the Description editor.
Add your own code
If you want, you can add your own code and have it being styled (with the blue background, etc.), the same way that the code copied from the Onload, Pre and Post editors appear. Simply enclose it in an html pre with class as follows
<pre class='world_info_source'>
...
</pre>
However, it is often easier to just write the code in the main editor, include it with the world definition, and use INSERT_EDITOR as mentioned before.
The Onload editor
Unless the very first character of the code in this editor is #, the content of this editor is assumed to be some Javascript code.
The syntax highlighting mode for this editor is initially set to be the same as the programming language; if code is present, the syntax highlighting is changed whether or not the first character is #.
Except when in world editing mode, whenever a world is loaded, or reloaded, the code in the Onload editor is automatically executed using either Javascript's eval() or Python/Brython's exec(), again based on whether or not the first character is #. You saw the result of this in the third world created in the previous chapter.
This onload code can be used to specify which programming language or programming mode must be used for a given world, as well as for dynamically creating world features, including new objects represented by custom images.
Unless some custom code is included in the Pre or Post editor, you should not set the programming language or mode; this way, a student could use your world with programs written in all of the available modes and programming languages.