Creating a world: three different ways
While the menu driven World editor included in Reeborg's World makes it possible to create your own worlds, it is limited to create worlds with predefined objects. Furthermore, it only creates static worlds which are then interacted with through a user's program. A world creator may wish to introduce additional interactivity by changing the state of the world when a user's program has achieved a partial goal, like reaching a predefined position. The functions documented in this book are intended to give world creators all the flexibility they need to create their own worlds.
If you follow along the instructions described in this chapter, you will first create and save a world using the menu driven World editor and then create the same world running a program that makes use of available methods instead. Finally, you will learn how to dynamically create a similar world using the Onload editor.
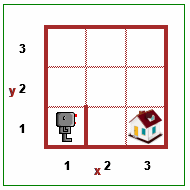
The world that we will create will:
- be much smaller than the default world
- have a wall blocking Reeborg's way
- have a house indicating a final position that needs to be reached.
This is what it will look like:
It is important that you follow along, creating three different versions of the same world (programming task) so that you can understand the more complex examples provided later.
1. Using the menu-driven World editor
For this example, you need follow along on the Reeborg's World site. I know that you will find at least some minor differences between some of the images included in this book and what you see on the actual site as I often tweak the site to make improvements. If the differences are so large as to make the instructions difficult to follow, please contact me so that I can update the information found in this book.
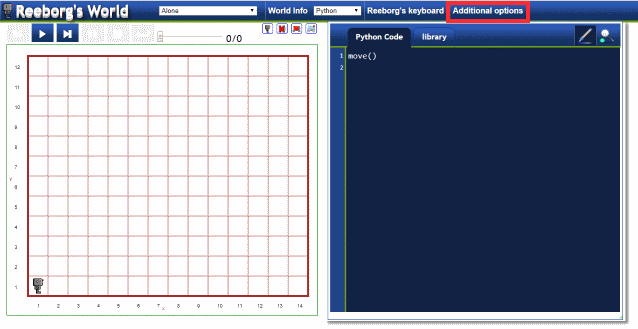
To access the menu-driven World editor dialog, you first need to click on the Additional options button.
Then, in the window that opens, click on the Edit world button.
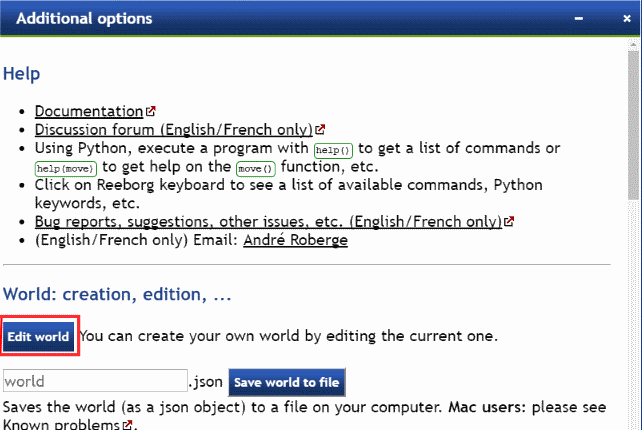
This will open the menu-driven World editor (and minimize the Additional options window that was previously opened).

This window, like all other windows that can be opened in Reeborg's World as well as the Code editor, can be resized by clicking and dragging on the sides or at the bottom, or can be moved on the screen by clicking on the top bar and dragging to a new location.
As you hover your mouse over the menu bar near the middle of the World editor window, various additional options are displayed.
Make sure that the world that is currently selected is the default world named Alone, which has a robot in it at location (1, 1) and nothing else; it is the world displayed in the very first image shown in this chapter.

Then, in the World editor, click on World dimensions; a dialog similar to that shown below should appear.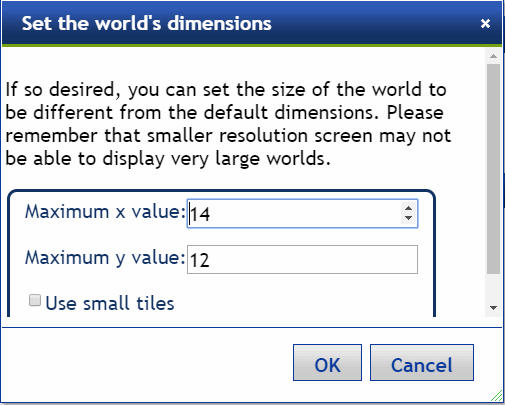
Change the maximum values for x and y both to 3 and click OK; the world displayed should now be much smaller.
Next, hover over the Goal menu item and click on the Robot sub-menu: this allows us to choose a final position as a desired goal for the robot.

By default, this final position can be indicated by one of three images.

Click on the image of a house. Then, in the small world, click on the grid location (x, y) = (3, 1). The world should now look as follows:

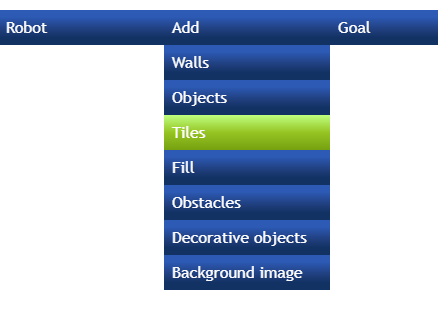
Finally, hover over the Add menu and click on Walls.
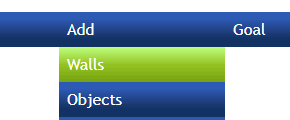
Then, click on the location of the vertical wall immediately in front of Reeborg; the result should be the following.

It is now time to save your work. Click on the Save world in browser button.

In the dialog that appears, enter a name and click OK. I chose world_1; this is the name that is shown in the world selector at the top.

Dismiss the World Editor by clicking on the X at the top-right corner. The World editor window should disappear and the appearance of the world grid should change, indicating that we are no longer in editing mode.
The world has been saved in your browser's local storage; unless you explicitly delete it, it should be available next time you visit the site. However, you cannot share this world yet. To do so, maximize the Additional options window by clicking on the bottom arrow to the left of the X at the right.
![]()
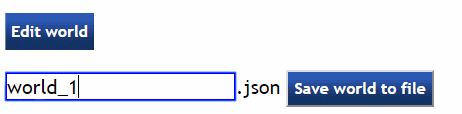
Next, in the text field under the Edit World button, enter a file name (I again chose world_1); the ".json" extension will be automatically added reflecting the fact that a world is a simple javascript object stored in json format. After entering the name, click on the Save world to file button.
Depending on your browser and your computer type (Windows, Apple or Linux), you may be given (or not) a choice of location to which you can save your file, or, if using Safari on an Apple computer, the content of the file might be displayed and you might have to explicitly save it using a standard Mac file dialog. I trust that you will be able to both save the file and find where it was saved.
That's it! Using the World editor, you have created and saved a new world. You might want to test it by writing a program that will make Reeborg reach its final destination.
2. Using a simple program
This time we will create an identical copy by writing a program instead of using the menu-driven World editor. Remember what we want for this world:
- Starting from a default world, we want to change its size.
- Next, we want to use the image of a house to indicate the desired final position for Reeborg.
- Finally, we want to add a wall in front of Reeborg.
Here's how to do this using the Application Programming Interface (API).
- Start with the same default world as before [Alone].
- Enter the following program in the editor and execute it; you can use either Python or Javascript to do so.
RUR.set_world_size(3, 3)
RUR.add_final_position("house", 3, 1)
RUR.add_wall("east", 1, 1)
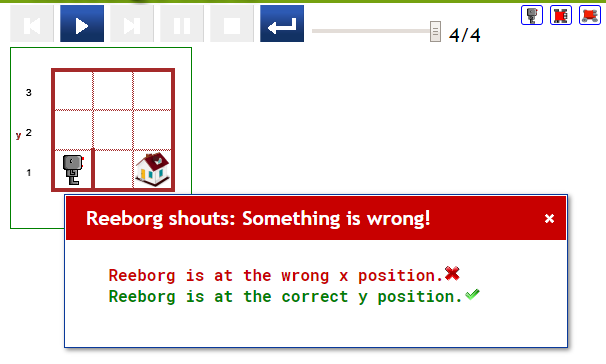
The result should look like the following, where I have moved the Reeborg shouts dialog window to be able to see the world. Leave it as is, without reloading.
- Like you did previously, Click on Additional options, followed by Edit World so as to be able to save the world.
Click on the Save world in browser button, entering a different name than you did previously (I chose world_2).
Next, dismiss the World editor window, maximize the Additional options window, and save the world to a differently named .json file.
The contents of the two files you have saved should be identical. You should confirm this using a "diff" program on your computer, or an online tool, such as https://www.diffchecker.com/.
Note that, instead of using
RUR.add_wall("east", 1, 1)
we could have used
RUR.add_wall("west", 2, 1)
Internally, rather than using all four possible directions (north == towards the top, east == towards the right, south, and west), everything is converted to only use north and east.
3. Using the Onload editor
Again start with the default world [Alone]. Then click on the Additional options button, followed by the Edit world button to change the mode to world editing. Move the World editor window so that you can clearly see the code editors. Instead of only one editor tab (if you use Javascript) or two (if you use Python), you should now see five or six available editors.
Copy the code which we used previously from the main editor (Python Code in my case) to the Onload editor. Once this is done, you can delete the code in the main editor.
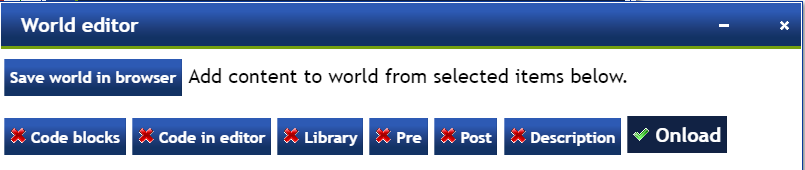
Next, in the World editor window, click first on Onload to indicate that you wish to save the content of that editor as part of the world content.
While still in editing mode, save a copy of the world in the browser (giving it a different name); also save it to a file. Then, dismiss the World editor window: you should see the world change to look identical to the previous versions. However, the file that you saved is different from the previous versions.
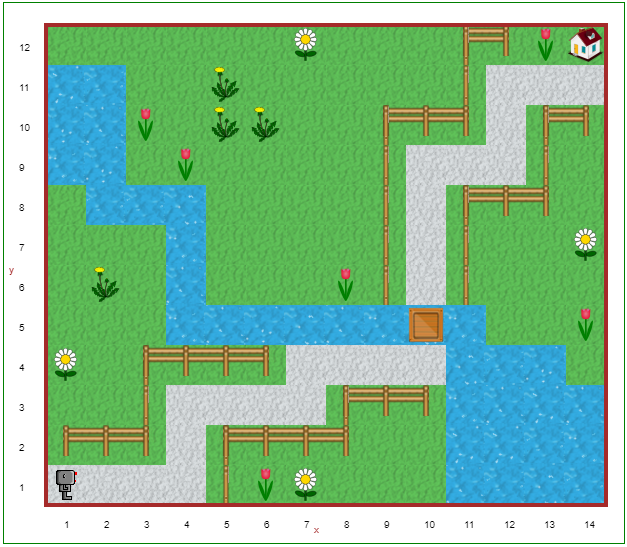
Which way is better?
The answer is ... it depends. If all I want to do is to create a static world where all artefacts except the robot are at a fixed position, and where I only use default artefacts/images, like the world shown below [except for the bridge over the water], I find that this is more easily done using only the menu-driven World editor.
However, if I want to use different artefact, or to create new types of interactions, etc., I most often use a hybrid approach where I first write all the code in the main editor, like you did in the second example, doing various tests until I am satisfied with the result. Then, I move some of the code to the Onload editor and, very often, some to the Pre and Post editors whose role I will explain in the next chapter.
I have no doubt that, as you create more worlds, you will find an approach that works best for you.